Morphing of Image
This tool is intended for use with maps with unknown projection and datum, or with distorted maps. In other cases, please try direct calibration first.
When drawing vector map with use of scanned paper map and tracks acquired with GPS unit, you can often encounter the problem of paper map not matching the tracks, even if it was declared as a 'GPS map'. In such case another problem pops-out and this is how to draw the rest of objects as it is not clear how to position them with respect to the measured tracks. If whole image is just shifted, you can use main menu > Image> Move function to position the image under vector tracks properly. If deviation between image and vector parts is not constant, correction requires more labor.
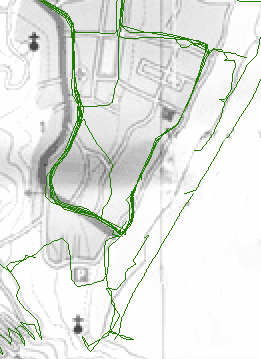
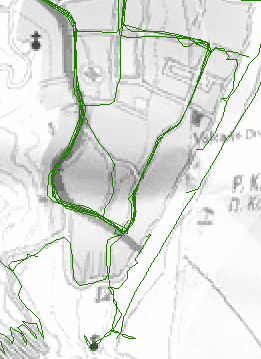
Fig. 1. Measured tracks do not match scanned paper map very well (left).
Image after non-linear
morphing with three pairs of points (right).
Mapwel software provides 'Image Morphing' tool for non-linear calibration of bitmap image to allow user to adjust image before actually drawing vector objects on top of it. Morphing function uses pairs of points defined by user. Image is calibrated so that area around the first point of each pair is transformed into area around the second point of each pair. Click on main menu / Image / Image Morphing to start image adjustment.
The first pair of calibration points will appear on the screen. They are one of top of the other. Click on the cross indicating position of the point and move it aside. Now you can see both points in the pair and an arrow between them, which indicates direction of image transformation in this place.
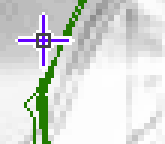
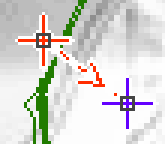
Fig. 2. Pair of calibration points.
If you click right mouse button on any of the calibration points, a pop-up menu appears, which contains following command: Preview, Original, Add Pair, Delete Pair, Morph Image, Cancel.
Place calibration pair on some corresponding places (fig. 3. left) and use the Preview command from pop-up menu to see effect of calibration (fig. 3. right). First point of the pair is placed on street on the raster image. Second point is placed on the corresponding place of the measured track. In Preview, area near first point is transformed into area near second point and raster image matches the measured tracks much better.
We use Preview for now, because there will be more calibration pairs added. As adjustment is performed on a raster image, each change could add distortion to the image. Therefore, use Preview to see effect of calibration until all pairs are added. We will use Morph Image to perform all changes at once at the end of calibration.
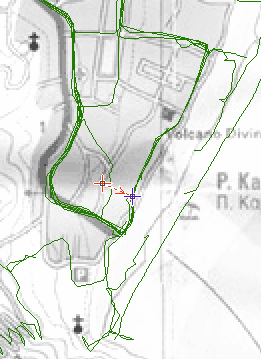
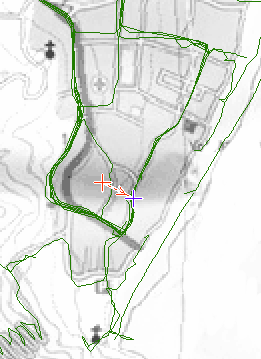
Fig. 3. Image with single pair of calibration points before calibration (left) and after calibration (right).
Now we will add second pair of calibration points to calibrate upper part of the image. Use Add Pair command from the pop-up menu. Notice that image returns to original form to allow user to place all points under the same conditions. Use Preview command to see calibration with two pairs. You can switch between Original and Preview mode to examine points placement and calibration effect.
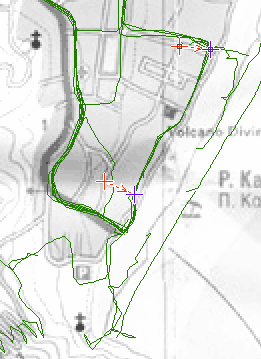
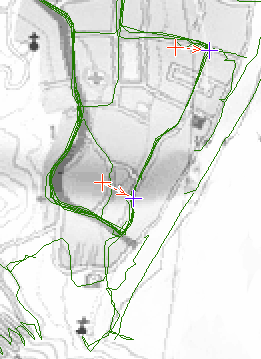
Fig. 4. Image with two pairs of calibration points before calibration (left) and after calibration (right).
Measured tracks fit adjusted image quite good now, except the bottom part of the image. There has to be one more calibration pair added.
Usually, there should be not many calibration pairs used, and they should be not placed one near to the other, because influence of each pair reaches only to the nearest pair. If pairs are too near one to the other, image gets distorted because of adjustments being too local.
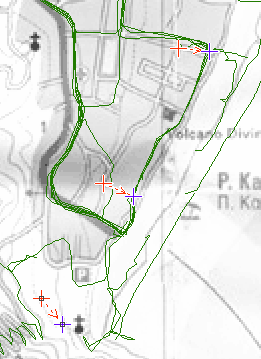
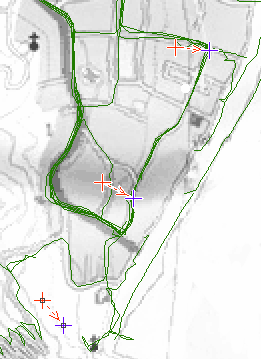
Fig. 5. Image with two pairs of calibration points before calibration (left) and after calibration (right).
Notice that roads near 3rd pair are calibrated even when the pair
is not placed on any particular object on the image (left).
Use such approach to prevent pairs being too near one to the other.
The image seems to be calibrated quite well with three pairs of points. So far we were using the Preview mode. Now click on Morph Image function to perform all adjustments to raster image at once.
When making a large map, calibrate it part-by-part, each part with use of several pairs (like shown in above example). Do not calibrate the whole map at once as each pair slows down the calibration process. As the influence of pairs is more or less local, there is no reason to calibrate large map at once.