How to Create Parcel Map from ESRI Shapefile
Import of parcel map from shapefile and its conversion for use in GPS is a common task performed with Mapwel software. To display the parcel boundaries in the GPS properly, a specific conversion tool should be used. Following example explains how to do it.
The basic information about ESRI shapefiles and their support by Mapwel software can be found in Import of ESRI Shapefiles chapter. Therefore, some less important steps (for parcel maps building) are skipped in this tutorial.
1. Select Proper Coordinate System
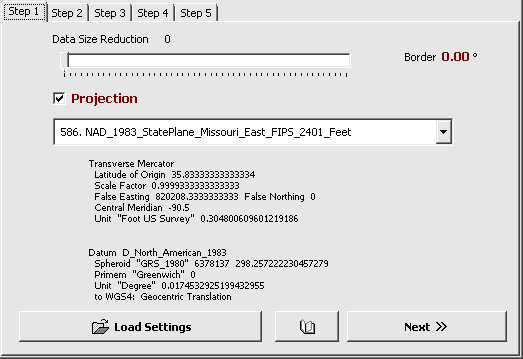
The shapefile (.shp) itself does not contain the information about coordinate system used inside. You should either know which coordinate system was used, or have .prj text file with respective data.
In below example the .prj file contains this info about projection used for the shapefile: NAD_1983_StatePlane_Missouri_East_FIPS_2401_Feet.
Use main menu > File > Open to import ESRI shapefile to work area of Mapwel. When the import wizard appears, select above mentioned projection from the list. The rest of map properties are set on next tabs of the same window.
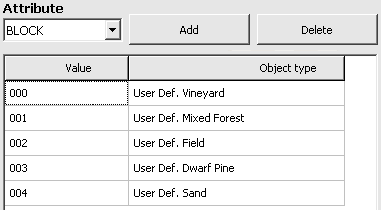
2. Re-type Objects
Assign relations between ESRI shapefile attributes and Mapwel object types. Mapwel uses this table to set type (class) to imported objects. In this case, it allows to assign class (and consequently the color and texture) to the polygons.
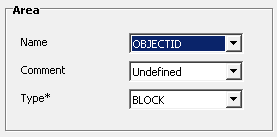
3. Set Parcel Name and Comment Label
While still in the shapefile import wizard, select the attribute field from which name label and/or comment label are taken. These text labels will be displayed by GPS device. Each shapefile has other set of attributes. Select those that are the most proper for your map. In this case, we use OBJECTID attribute as a name label. The comment label is not used. The Type box contains attribute chosen in step 2.
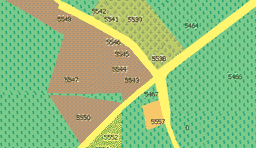
4. Check the Parcels Look
If you plan to re-load the same shapefile in the future, save settings to disc. Then finish the shapefile import wizard. If proper coordinate system was selected, the map appears in the work area of Mapwel. Use tabs at the bottom of Mapwel main window to switch view mode to Color GPS. Although imported polygons have proper fill texture (as assigned in step 2), they have no border and are displayed as large compact areas, therefore. Boundaries of individual parcels are not visible because polygon objects do not have an outline property. It is necessary to create outlines as a new polyline layer.
5. Add Parcel Boundaries
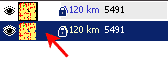
We will use polylines to create boundaries of the parcels. Select all objects in the map (main menu > Edit > Select All) and group them together for easier manipulation (main menu > Objects > Group). Then use copy and paste (CTRL+C, CTRL+V) to create exact copy of polygons on top of the original ones. The red arrow on below picture marks the copy of grouped polygons in the list of map objects.
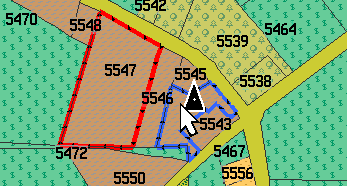
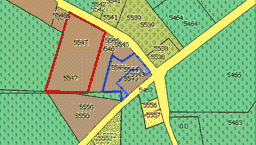
Now use the main menu > Convert > Area to Transparent Grid Cell command. This will convert all selected polygons (our copy of parcel polygons) to boundary polylines. At the same time, it will add empty icons into center of each cell (parcel). The name and comment text label of icon is taken from the converted polygon. Now we have the bottom layer of original polygons, the layer of polyline boundaries (converted from copy of polygons) and the layer of empty icons with name and comment text fields. It is possible to select and edit type (class) of each individual boundary, like illustrated by red and blue parcel boundary on a below picture.
6. Upload into GPS Device
The shapefile after conversion and upload into GPS device looks like below screenshot. Boundaries of parcels are visible and some of them are even set to custom polyline styles.